Category Archives: Uncategorized

Better late than never …

Image

<a href=”http://www.bloglovin.com/blog/2620035/?claim=85wt4m4dbsz”>Follow my blog with Bloglovin</a>

Where did that year go?!  Apologies for the radio silence, there has been sewing, and there will be blogging again very soon.  In case anyone still cares about this little corner of the Internet, I thought I had better take care of Google Reader-related admin.  I promise that if you choose to continue following this blog, there will be something to read!

More in the very near future, hope to see you on the other side!

Parma Violet

Well, amazing but true, this past week has seen the dusting off of my trusty machine and actual SEWING taking place.  I can’t tell you how much of an achievement this feels!  Time is at a premium with a 13 week old who refuses to nap during the daytime.

Where better to start than by jumping on the bandwagon of the lovely Colette Violet.  I’ve seen some gorgeous versions of this online, not least the beautiful fitted ones modelled by Joanne as part of the recent OWOP challenge.  I loved the fitted look but decided to go for the pattern as written to start with – I’m currently breastfeeding so slightly roomier clothes are required for easy access!  I’m not 100% sure I made the right decision as it’s a bit too blousy for my liking, but anyway here it is:

The fabric is a cotton lawn I got last summer at Anglian Fashion Fabrics in Norwich.  Can you still get Parma Violets?  I never liked them, but the print makes me think of them in a happy nostalgia way.  I cut a 12 but I think I probably should have done a smaller size plus FBA.  I might try this, and I might also go back to my muslin and put in some waist darts to see what happens – yes, I did actually make a muslin but only really looked to see if it fit around the girls properly rather than thinking about the whole picture.  Bit of a beginner mistake, cutting according to your largest part, but to be honest it was so exciting to be doing some actual sewing that I wasn’t in the mood for faffing around with adjustments.

I did take time to make the inside look good (a hangover from the wedding dress!), so it was French and self-bound seams all the way.  I also used covered buttons which I absolutely love, but I think with all that pattern a bit of piping to define the collar would be good.  Next time!

Anyway, I’m happy enough with it, and will definitely make a couple more but not before I’ve played around with the sizing.

Up next, another Colette fave, Ginger!  I’m hoping this is as quick and easy as everyone says because I really need to stop wearing my faithful maternity denim skirt – not as bad as it sounds as it’s under the bump style, but as I no longer have a bump to hold it in place it’s not ideal.

I’ve also decided to join Karen’s Pyjama Party – originally a pair of PJ bottoms was going to be my return to sewing project but the need for clothes I could wear out of the house was greater.  But now what better time to take part in my first sewalong!

Backtracking slightly

One final post on the wedding before we consign it well and truly to my sewing history!

You may remember that as well as Sue’s wedding dress I was making my own bridesmaid dress, using Vogue 1192.

Well, just to say I did walk down the aisle in this dress, which was nothing short of a miracle.  Suffice to say that not having made anything like THE DRESS before I had no idea how long each stage would take, and here is my tip to you if you ever find yourself taking on anything like this and especially if you are as novice as I am when it comes to couture sewing – ALLOW AT LEAST THREE TIMES AS LONG AS YOU THINK YOU WILL NEED FOR EVERY STAGE.

If I ever did it again, I would have a much better idea of how to go about everything and I wouldn’t have to study each technique before I used it, but as it was I found myself finishing THE dress at about 10pm the night before the big event.  Thank heavens Sue was amazingly relaxed about this, more so than I would have been, that’s for sure!

So all well and good, it was finally done.  What was not done, or even started, was my own dress, which was still in the bag as lengths of silk, lining and a very roughly adjusted pattern with a never put together toile.  Since I was Maid of Honour AND had to stand up in the front of the church and perform two songs as well (one of which was in Welsh!), attendance in underwear and shoes only was not really an option.

Lest you should think me so laid back / mad that I hadn’t thought about getting it done over the preceding months, I had felt I needed to finish Sue’s dress before starting mine.  (In the master plan, this would have happened a good month before the wedding!)

I can’t tell you anything about the making of my dress, other than:

  1. I started at 10:30 pm, sewed like a crazy woman until 5:30 am, slept 2 hours and hemmed it while putting on my makeup for the wedding
  2. It fit (more or less), but does not bear inspection, close or otherwise
  3. This is never a good idea, and especially not when you are 6 weeks pregnant and hormonal
  4. DO NOT do this at home!

Anyway just to prove it actually did materialise in the end, here I am, suitably obscured, plus a couple of action shots!

Something blue embroidered inside

Something blue embroidered inside

(Perhaps a little concealer could have been used on those dark circles!)

Anyway with that, it’s farewell to wedding dresses and onto less lofty things!

Back from obscurity – and a newly finished creation!

Hello again to anyone who still cares enough to have this blog on their radar screen after an absence of over 9 months!  Rather a pathetic showing, especially as I just checked and it’s only just over a year since I started writing it…

I was so touched by all the lovely comments on the finished wedding dress, and also amazed at the numbers of people who read that post – a very belated thank you for making all the hard work even more worth it.  Since then I have sewn hardly a stitch – except in June when I made these napkins and tablecloth for the family brunch after my cousin’s lovely wedding in California (he is in the US Marines, hence the theme).

This was a fun collaboration between me and my very talented cousin Nancy B, who designed the fabric and had it printed at www.spoonflower.com.  If only I had her talent!  (It’s hard to see here but among all that camo action are hearts and lovebirds).

I can't pretend I made these, but they were impressive - and delicious!

And sadly, that is it on the sewing front!  Not for want of inspiration, or dreaming about all the clothes I desperately need, or fabrics in the stash to create them with.  Partly it was case of total sewing overdose, but it has also been difficult to get back to normal sewing after such a mammoth project – weirdly I feel nervous of starting more ‘basic’ things because nothing else will probably quite measure up to that again.  It’s that little pair of demons perfectionism and fear rearing their ugly heads again – they will be conquered!

Big changes have also happened at Maison Bold!  Two weeks before the wedding, when I was staying up until the early hours most nights and drinking way more coffee and wine than is good for a body to deal with the mounting stress, I discovered that I was miraculously pregnant!  We had given up hopes of a family after rather a bumpy road, so it was such a joyful shock.  Thank you, wedding dress and sewing gods!  So in January I went from this:

to holding my gorgeous little miracle bundle, RTH:

who 8 weeks later is snoozing on my lap as I type with one finger.

Life is very good.  And there will be sewing again.  Soon. x

Skinny seaming!

Thanks for your lovely comments on my last post – it means so much to know that people are willing me on in this mammoth enterprise!

So, a challenging aspect of the dress is that the whole thing has an organza overlay.  Of course, this means that beautiful, thin, hopefully perfect seams are in order!  (- Sue said she knew I’d be able to replicate the original design, as it is very clean and ‘simple’.  I know that you will understand that the major flip side of this is that there is absolutely no room to hide anything!  Oh for some frills and flounces!)

Anyway.  The skirt and bodice have 7 panels each, with princess seams on the bodice and fairly curvy ones on the skirt too.  I love a nice French seam, but they apparently don’t work on major curves, so I had to find another option.  Mock French was a possibility, but to be honest the thought of folding in all those tiny seam allowances did my head in without me even trying it!  I had a look at Kenneth King’s techniques in his book and on Threads, but my addled brain couldn’t really cope with them.

So I came up with a variation on / combination of his technique and the French seam.  I’m sure I’m not the first or only person to have used this, but I didn’t see it anywhere in my various searches.  For now (until anyone advises me otherwise) I’ll call it The Satin French Seam.

For me it nicely combines the neat, clean, crisp finish you want on this kind of fabric, the ability to make lovely thin seams (mine are about 3.5mm), and avoidance of hours of fiddly folding.  Again, this is not a quick technique (3 skirt seams took 2.5 hours), but I’ve given up expecting anything on this little project to be speedy!

Here’s what I did:

  1. As in a normal French seam, start off with wrong sides together.  Using a straight stitch foot and a 2.6mm stitch, I sewed a seam with an allowance of 15mm (my cut seam allowance was 20mm).  I stabilised the organza by sewing the seam over a strip of tissue paper.
  2. Press the seam flat to ‘set’ the stitches.
  3. Change to a zigzag foot and sew a tiny zig zag to cover the straight seam.  For mine, I used a setting of 2mm width, 0.3mm length.
  4. Press the seam flat again.
  5. Cut the seam allowance off, as close to the stitches as you dare!  I suppose if you accidentally snipped one it might not be the end of the world, because (a) you could probably fairly unobtrusively just stitch over that bit again and (b) it will be enclosed after this, but happily I haven’t needed to test that theory.  YET.
  6. Press the seam to one side, then turn so the right sides are together and the seam is enclosed, and press again.
  7. Back to the straight stitch foot, I used a 2.2mm stitch length to sew the final seam – again as close as possible to the stitching.
  8. Press three more times – first flat to set the stitches, second to one side and third on the right side to make sure the seam is perfectly open.

Tada!  The final result.  Skinny seams!

Here’s an approximate idea of what it will look like on the finished article – here just a practice one, posed roughly over my arm – this is quite tricky with two slippery fabrics and the other hand holding the camera!

Let’s hope it works as well on the bodice!

Glacial progress

Progress has been made on the wedding dress (and not before time, as the clock is ticking rather too quickly for my comfort!) – but I must admit that I have been feeling just a teeny bit stressed about the whole thing and so haven’t really had the headspace to post!

Anyway, a little bit of progress news…

We have a bodice – which even just about stands up on its own!  Here without its bones:


And a skirt, not looking like much here as it’s hanging inside out to let the seams relax or whatever they might do:

I don’t think it’s giving too much away about the final product by showing these two pictures – it’s still looking pretty generic here!

With Bridal Couture firmly in hand, I have been trying to do everything as professionally as possible.  Here’s a glimpse of the inner structure of the bodice, before the top facing was turned over:

Boning channels in place (some hidden under seam allowances, and some horsehair braid stitched at the fold line.  I must say, I felt extremely excited going to buy this, having read about it so many times on Gertie’s blog, but not being much of a circle skirt wearer I didn’t think I’d ever use it.  But Susan Khalje recommends it to give a nice sharp upper edge to a straight across bodice, so use it I did!  Going into MacCulloch & Wallis I had absolutely no idea what I was looking for, and imagined something which actually did vaguely resemble horsehair – at the very least a kind of beige / hessian type of thing!  What I was actually given was  a sort of stretchy white plastic mesh (it does come in other colours too).  I felt very professional to be needing such a thing, as if I had graduated to the next level of sewist – not that my skills have improved that much!

And then we have the skirt – the satin is underlined with a cotton batiste, and I decided that because of the skirt shape (fairly close over the hips) and fabric (slippery beyond belief) I had to avoid any misbehaving seam allowances.  What levels of sewing geekery have I reached when I tell you I have absolutely fallen in love with catchstitching.  Wow!  It looks so clean and neat and is just so satisfying!  I discovered my mom’s old pinking shears and used them as well to try and limit ravelling – I love the combination of the zig zags and crosses – sad I know, but I’m sure at least some of you understand what I mean!


It is not the speediest thing in the world to do though – for each skirt seam (i.e. two seam allowances) it took about an hour and a half, but I just pretended that I was a ‘main’ in a couture atelier and enjoyed the process (trying not to think too much about the ticking clock).  When I finished all of that I calculated that I had sewn over 17 metres of catchstitched seams on the skirt!  If anyone ever decides to inspect the skirt under the lining I will not be ashamed.

Inspired by both Susan Khalje and Gertie I am very proud to say that not only did I hand baste all the satin / underling of each skirt section together but I even hand basted the seams before sewing.  I did attempt to speed things up by testing some machine basting on one of the sections, but had to admit it really didn’t look nearly as good.  For someone who is usually perfectly happy to sew straight over pins, this is a major step forward!

Lastly, huge thanks to Gertie and Denise at The Blue Gardenia – I was very lucky to be the lucky winner of their recent giveaway of a lipstick, nail polish and fabulous vintage skirt pattern – I’m so looking forward to trying it all out soon!

We have liftoff… and a little splutter

Not before time, I have (***fanfare***) started on the actual dress rather than the toile.  – I did manage to squeeze in another quick flying visit to Cardiff two weeks ago to test out the fitting of my reduced bust  – until I had tried it on Sue’s body again, I just didn’t feel able to cut into the real stuff.  So that was all good, and the organza overlay, which I recut based on the myriad changes we had already made, was also pretty much fine, so time to get on with it!

After some pretty major battles with the FEAR, and a couple of those exam-type dreams where I suddenly realised the wedding was a week away and I hadn’t started on the dress etc, I sat down for a heart to heart with Susan Khalje.  She told me to calm down and took me through all the steps I needed to actually make the bodice.  So I wrote a plan, gave myself a stern talking to and told myself that it would be much worse to have NO dress than to have a dress which was a bit less than perfect.

Then I took hold of my seam ripper and dismantled the toile.  I thread traced all the seam lines and pressed the pieces:

And then grabbed my trusty scissors and started cutting into hundreds of pounds of beautiful silk!  Yikes!

The bodice will have 4 layers – outer silk, a layer of cotton drill, a layer of coutil and then the lining.  (Plus then the organza over the top.)

I don’t know if any of you have ever worked with coutil, but that stuff is TOUGH!!  After killing my fingers on just a little practice square basting, I invested in a thimble – what a difference that makes!  Now I just keep stabbing the back of my left thumb as I stick the needle through, but at least I don’t feel like I’m going to pierce my finger.

I took my silk thread, new needle and thimble and basted away!  7 lovely  bodice pieces – I just love the way they look so pillowy, and the silk feels so gorgeous!  I love its beautiful pearly colour.  As you can see below, I added large seam allowances to the pieces, as recommended by Susan.

Real v toile pieces

After a late night’s basting, and feeling very pleased with my progress, I consulted my notebook to find out what I would be doing the next day … and here comes the stumble.  BEFORE basting all the layers together, I should have stitched the boning channels onto the coutil.  I could have cried!  Oh well, what’s a few hours between friends?  Looking on the bright side, I’ve learned a good lesson before things progressed too far:  ALWAYS CONSULT THE PLAN TO SEE WHAT COMES NEXT!

A pile of pillowy pieces

I was in Cardiff again this weekend for Sue’s hen do, so tried out the basted together bodice on her – it’s so exciting!  With all the layers, it is really feeling like a wedding dress!  Here are the pieces ready to be put together:

Bodice ready to go!

Pre hen do festivities (I’m wearing Simplicity 2497):

Anyway, I have a dress to sew (and now just 6 weeks before the wedding) – wish me luck!

My sewing inspiration

Today is Mother’s Day here in the UK, and although I am not a mother myself, I am lucky enough to have one.  Sadly, I can’t spend today with her, because she lives thousands of miles away, so I feel a bit left out of all the Mother’s Day goings on around me.  I thought what better way to create my own celebration than by honouring my own lovely Mom, my early sewing and crafting inspiration.

As far back as I can remember, Mom was sewing: dressmaking, quilts, embroidery samplers…  When I was little, she would make us clothes, and I used to love watching her sew.  She produced some wonderful examples of 70s fashion (this is about 1974 or 75):

Patchwork maxi skirt anyone?

I think she also made the frilly blouse I’m wearing in this picture, although I’m not sure about my brother’s trousers!  She did make my Kermit the frog glove puppet, for an early ballet exam, when we had to do a dance of receiving a lovely box, opening it and then dancing with our doll / puppet.  I loved that Kermit!

I was a bit ungrateful sometimes though.   My Mom is American, and was not a fan of the nylon which was all-pervasive in 70s British school uniforms.  Despite what must have been hours she put in to making things for me, as a child I didn’t fully appreciate it (of course). I desperately wanted the nylon socks and pants with pictures on them that all my friends wore, and I felt a bit hard done by that my school summer dress was slightly different than the shop bought ones because it had a round collar rather than a pointy one.

I wish I looked like her!

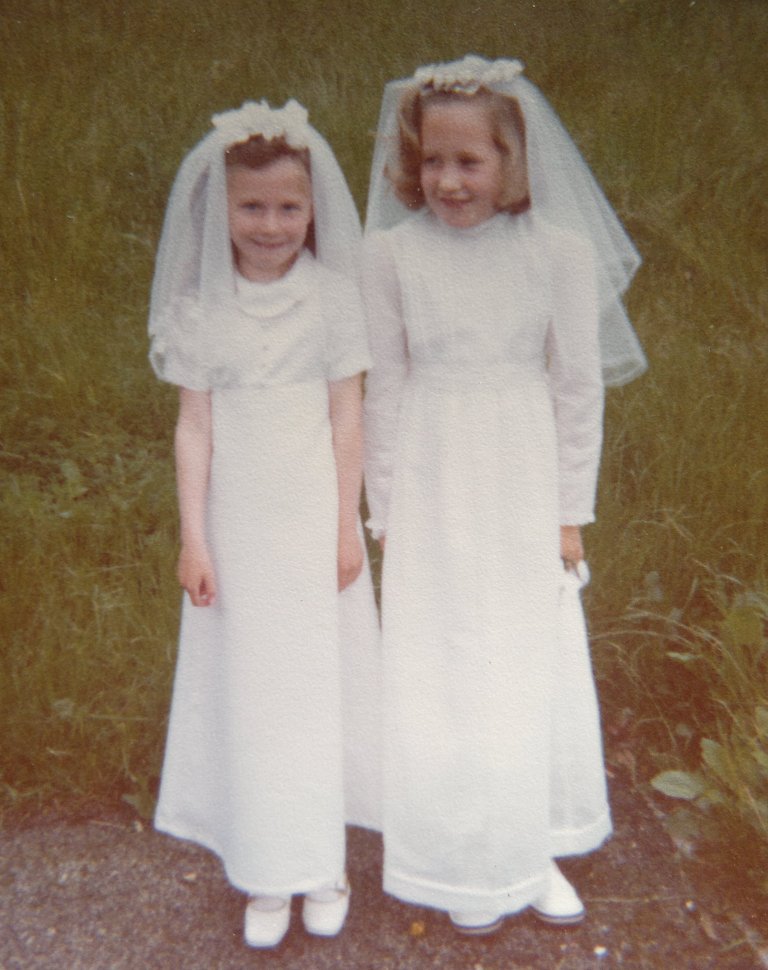
Here I am with my primary school best friend Ailish – I wonder where she is now! – at our First Communion in 1977.  Mom made my dress, and I think my veil and little pouch thing too.  I did love this dress, but of course because Ailish had  a short sleeved, shop bought one (and don’t you love her collar?), I was a bit envious of hers!

My Mom hated knitting, but still she laboured over a school cardigan for me.  Sadly, I don’t think I ever wore it to school, although I do remember trying it on and hating the wool on my skin (I still can’t bear it).  Who knows how long it must have taken her, and her general dislike of knitting meant her tension was so tight that by the time she finished the cardigan, it was too small.  Even though she hated knitting, she taught me when I was about 6, and I have loved it ever since.  Now, I can well imagine how disappointed she must have been to make such an effort, only to have it rejected.  Sorry!

Around 1978, my ballet school put on a production of the Wizard of Oz, and I was a chorus line flower.  My lovely Mom outdid herself, and actually made this tutu, which I still have in a box somewhere although it is rather faded.  She made the flower headdress too – I remember the petals were cut up pieces of a plastic lampshade covered in the satin.  I’m glad I can honestly say I was so proud of my tutu – at this time I was convinced I was going to be a ballerina, so this was my complete fantasy outfit – apart from the fact it had to be blue rather than white.  This picture makes me smile – we had to go along one day after school to have these pictures taken, and I remember so clearly thinking I would look much cooler and better in my woolly navy school tights rather than my ballet ones.  Wrong!

So today I celebrate and say thank you to my Mom.  I have a lot to be grateful to her for.

Without her I might never have discovered sewing and knitting, two of my greatest pleasures.

I’m sorry it took me until my adult years to fully appreciate all the things you made for me, but thank you for clothing me in lovingly made 70s fabulousness and giving me the love of stitching! x

Can you spot the skirt?

Spotty Jenny

Wedding dresses are all very well, but not exactly practical for walking down your average high street on a Saturday (especially when it isn’t your own).

I am chronically short of separates, especially skirts, so I broke my skirt virginity this week and jumped on the Burdastyle Jenny bandwagon.

I realise this doesn’t exactly make me a trendsetter, but I don’t think I’ve seen a bad one yet and just had to have one!  I must say, I wasn’t disappointed – I almost thought I was going to have a skirt (including toile!) in one day but then decided to faff around and bind the inside seams to give a secret hint of spring inside:

I had one of those bias binding making gadgets, which I had read about and heard were so great, such fun, so easy.  Well, all I can say is that was NOT my experience!  Nothing but a wonky uneven mess came out of the end of that little thing, so after several failed attempts and royally messing up my carefully created bias strips, I gave up on it in frustration and just folded down the sides the old school way.  I may try it once again, but that’s it.  I don’t know if my strip was maybe just a bit too wide, but I did follow the recommended width – who knows.

I absolutely love this skirt!  I can see at least one more of these in my near future, in a more work-appropriate fabric.  I can’t tell you how great it is to have a skirt that actually fits.  I even like it from behind!

The top I’m wearing is New Look 6808 which I made a couple of months ago.  Another winner, although it has some slight fitting issues I think to do with bust / armholes / shoulders – if I make it again I think I will do a toile to try and resolve them.  It’s a bit hard to see the bow detail on the collar, but here’s a close up:

I feared said bow detail was the end of this top when I tried it on to admire my handiwork, only to discover the bow was decorating my right shoulderblade rather than my left collarbone.  Whoops.  As you have to do a bit of pleating and stitching to attach the bow round the collar, I was fearful for my thin silk, but thankfully (a) not too many people spend much time looking at the back of my shoulder and (b) it was more resilient than I feared.

Onwards and upwards, no more procrastination on the wedding dress – the bodice is undergoing final fitting tweaks, we are almost ready to cut into the real stuff!  I had a revelation driving along the motorway on my way back from our last session the other weekend – you shouldn’t be able to (a) wear a padded bra (b) insert more bra cups and (c) still have plenty of room left over!   Even for an amateur sewist, perhaps it should have been clear what was causing the saggy bust – oh well, you live and learn!

A slight diversion

As well as the wedding dress, I am also going to be making my bridesmaid’s dress:

V1192

I have been going to a sewing class this term – or strictly speaking I suppose I should say I signed up for a sewing class but have so far not been the best attendee – I think I only have a 50% attendance rate at the moment.

Now though, the class is going to be a great way to have at least a few hours every week working on my own dress alongside The Dress – which as you can imagine is currently taking up most of my headspace and energy!

So veering into bridesmaid territory, I now have pieces to be sewn up into my toile – two toiles on the go at once, can you believe it?!  Such precision has never been seen before here at Maison Bold.  Is this the strangest pattern piece you have ever seen?

This is the right front – it’s so huge it doesn’t fit on one pattern sheet and you have to tape the 1A bottom section onto the top piece yourself before you cut them.

I’ll try and get it basted together before next week’s class so that I can move onto proper fitting.  According to the pattern companies my body is all over the place size-wise, so I expect there’s going to be quite a bit of adjusting to do.  I normally always have to do an FBA, but don’t have the first idea how I would go about doing one on a pattern piece this shape, so I’m hoping I can take away excess rather than adding in extra.  Maybe with the back darts and the side ruching it could just be a case of cinching it all in, as my waist and back are small compared to my curvy bits – but wouldn’t that just be a bit TOO EASY?!  But it would be nice to have an uncomplicated ride on one of the dresses at least !

I took along my upgraded bodice toile for a bit of input from my teacher too – it’s currently looking like this:

Boning channels basted in place (ignore the wonkiness of some of them, again, it was late! but I can see that I need to reposition a couple) and seams adjusted to hopefully give a better fit.  My sewing teacher made the suggestion of putting boning just next to rather than on the side seams so that you have somewhere you can nip in in the event of pre-wedding weight loss, so I’ll move those too and see how that works.  I also want to do a test with all the layers I’m planning to use in the real fabric to see if it’s stiff enough, because I’m thinking I might need to plan for an extra layer of underlining.

Anyway, we’ll see on Friday how successful this version is!  I’d better go cut out the polyester skirt toile v2 now so I can fit the whole thing together.

And the eagle eyed among you may notice that even my ironing board has had a brand new cover and underlay in preparation for the precious material it will soon be having smoothed over it.  I’m now on the hunt for a dry iron too, which Susan Khalje assures me (and all the other readers of Bridal Couture) is the way to go with these precious silks to avoid the unexpected splutter of water and scum which can happen with a steam iron on a low setting – I can definitely do without that kind of mishap!  In John Lewis today I was told that it might be better to get a new iron and never put any water in it so that you don’t get splutters, but have the benefit of the non-stick plate.  But then he said that might still burn the fabric.  Yikes!  Does anyone have any experience or suggestions?  Unfortunately, I’m not in the market right now for the gorgeous professional iron he was marketing!

Oh dear.  This sewing thing is really getting a bit out of hand, I can’t believe I just called an ironing contraption gorgeous.