Summer tops

Hello again!  Determined not to lose momentum after the last post (ok, not that that one took much effort), I grabbed the camera yesterday morning to take a few pics of recent tops just to prove that I do still exist and am still sewing, albeit at the pace of an extremely geriatric snail.

I have found it so hard over the past year to get shots of the few items I’ve made.  I finish something, and desperate for clothes I start wearing it asap, invariably getting toddler gunk of various descriptions all over it.  Or, shock horror, I get dressed without ironing, which doesn’t make for very nice blog pictures.

Yesterday the fortuitous combination of major ironing binge + sunny day + little guy asleep occurred so I dusted off the camera and headed out into the garden.  Only to find it was too sunny to get anything much decent (you won’t find me complaining about our current glorious weather though) so back into the dingy house I went.  One day I will learn how to use my camera properly and control light settings etc, but I’m afraid that is a project for the future.

Nothing particularly exciting here, just some much-needed wardrobe basics.  First up, Colette Sorbetto, made and loved by just about everyone in the blogosphere.  As usual, I’m late to the party but so happy to have one of these in my wardrobe finally!  I did actually make one last year which was unwearably tight in the bust department, so I then half cut this one out but never quite managed to finish it before the risible effort at summer was over.  A couple of weeks ago I dusted this off and finished it, and although I don’t think it’s my most favourite or flattering shape I love wearing it and there will definitely be another at some point.

Image

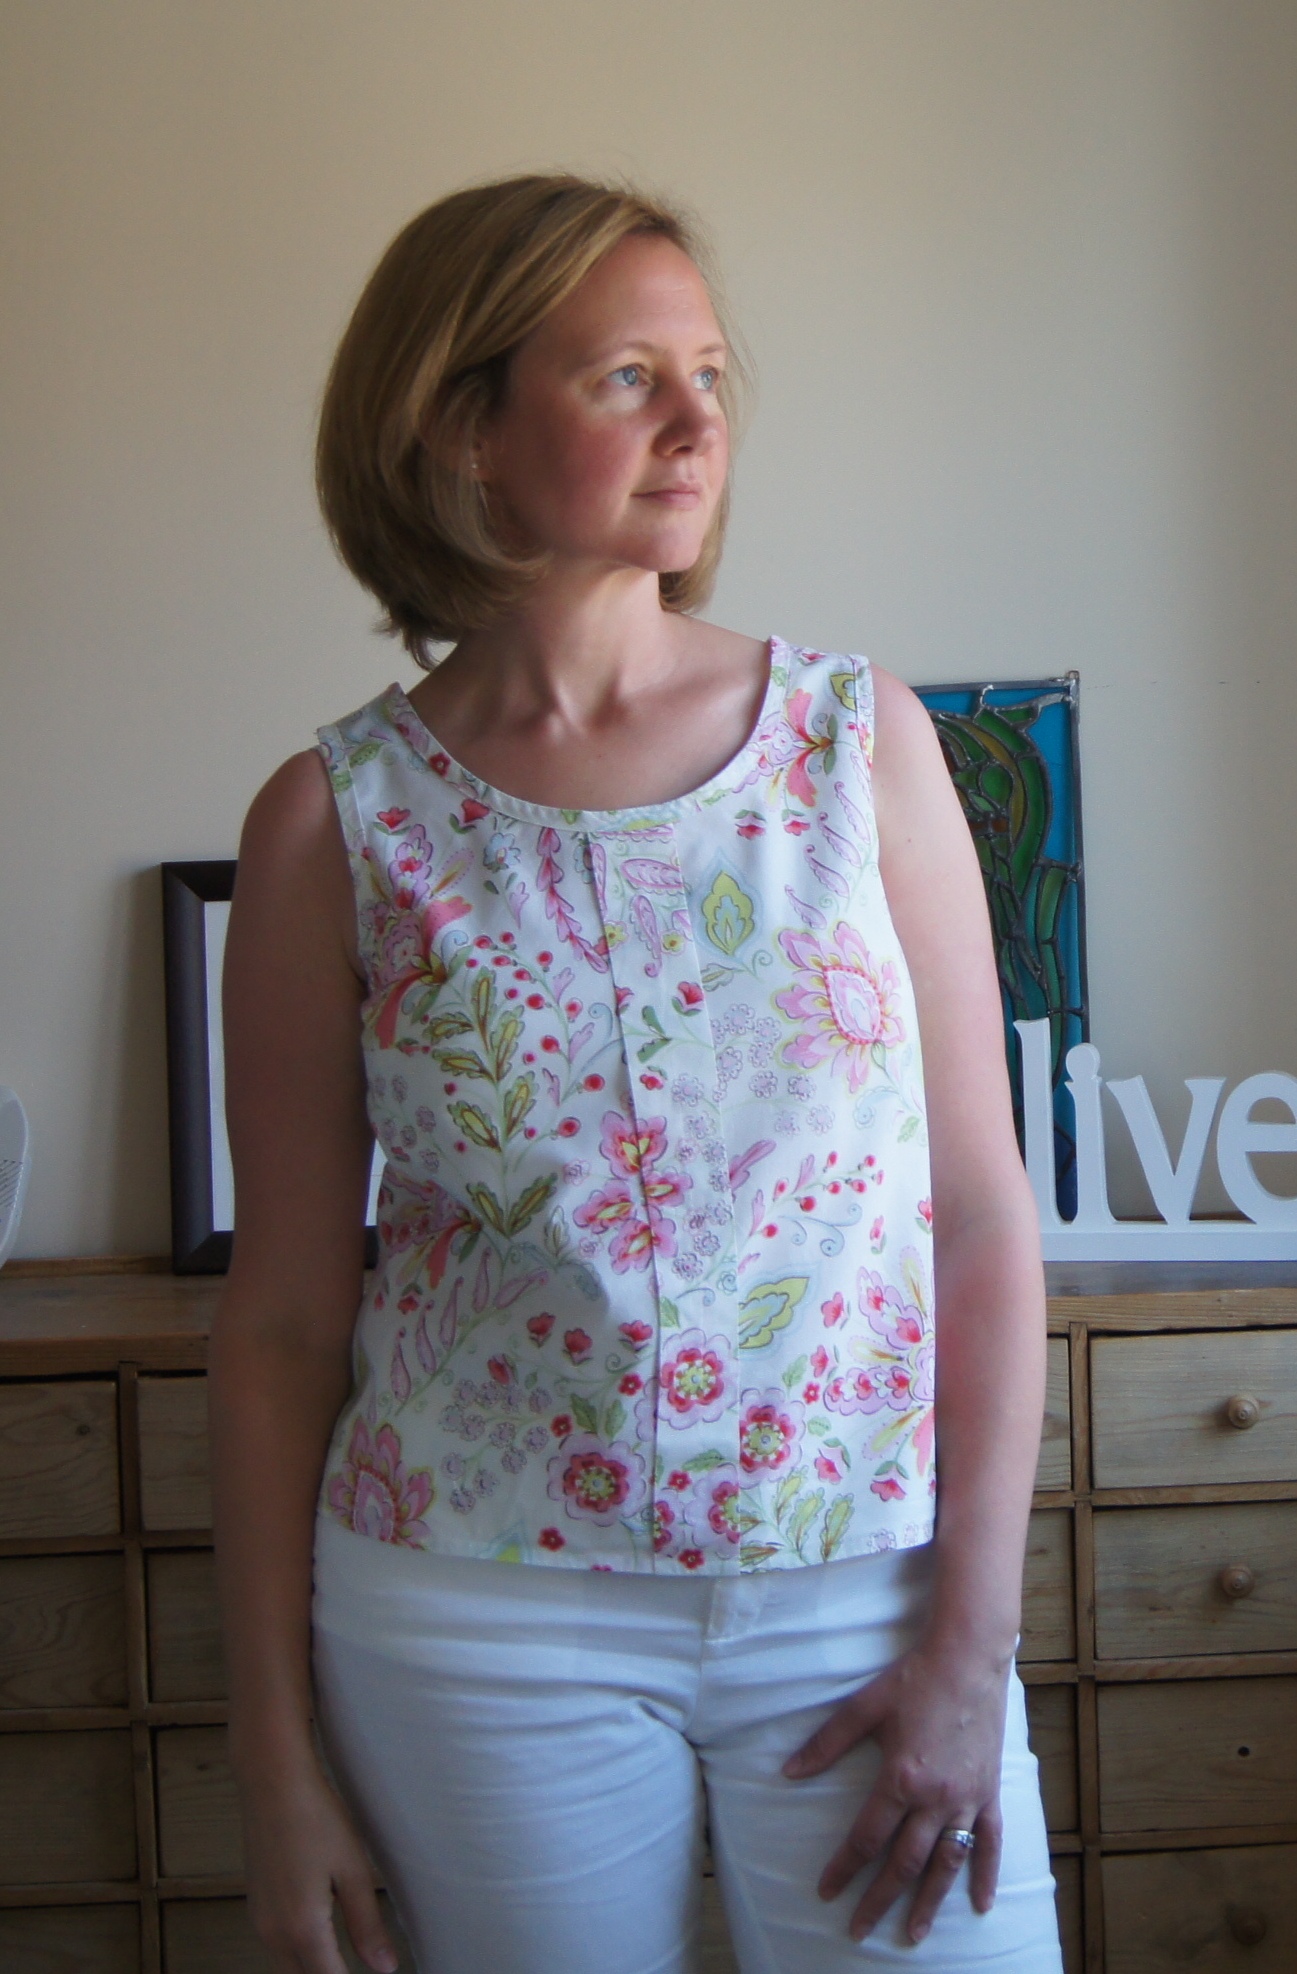
I love the bias binding edge finishing, so neat! I think this may become my go to finish rather than faffing around with facings all the time.

My current sewing struggle is getting to grips with fitting my body properly.  I feel like I have the craziest measurements – I have to do a large FBA in the front and then take a large chunk out of the centre back.  Let’s not even talk about the bottom half!  It’s still all a bit trial and error – I wonder if I will ever become one of those people who say ‘I cut my usual size x and made my standard x alterations and it fit like a dream’.  I live in hope!

Here are a couple of iterations of Simplicity 2599 which I made last summer.  I’m not usually a particularly frilly person but as you can see, I wholeheartedly fell for it with this pattern.  These were made before I realised my need for a centre back adjustment so they are a bit on the blousy side but perfect for nursing and lovely in this glorious heatwave.

Image

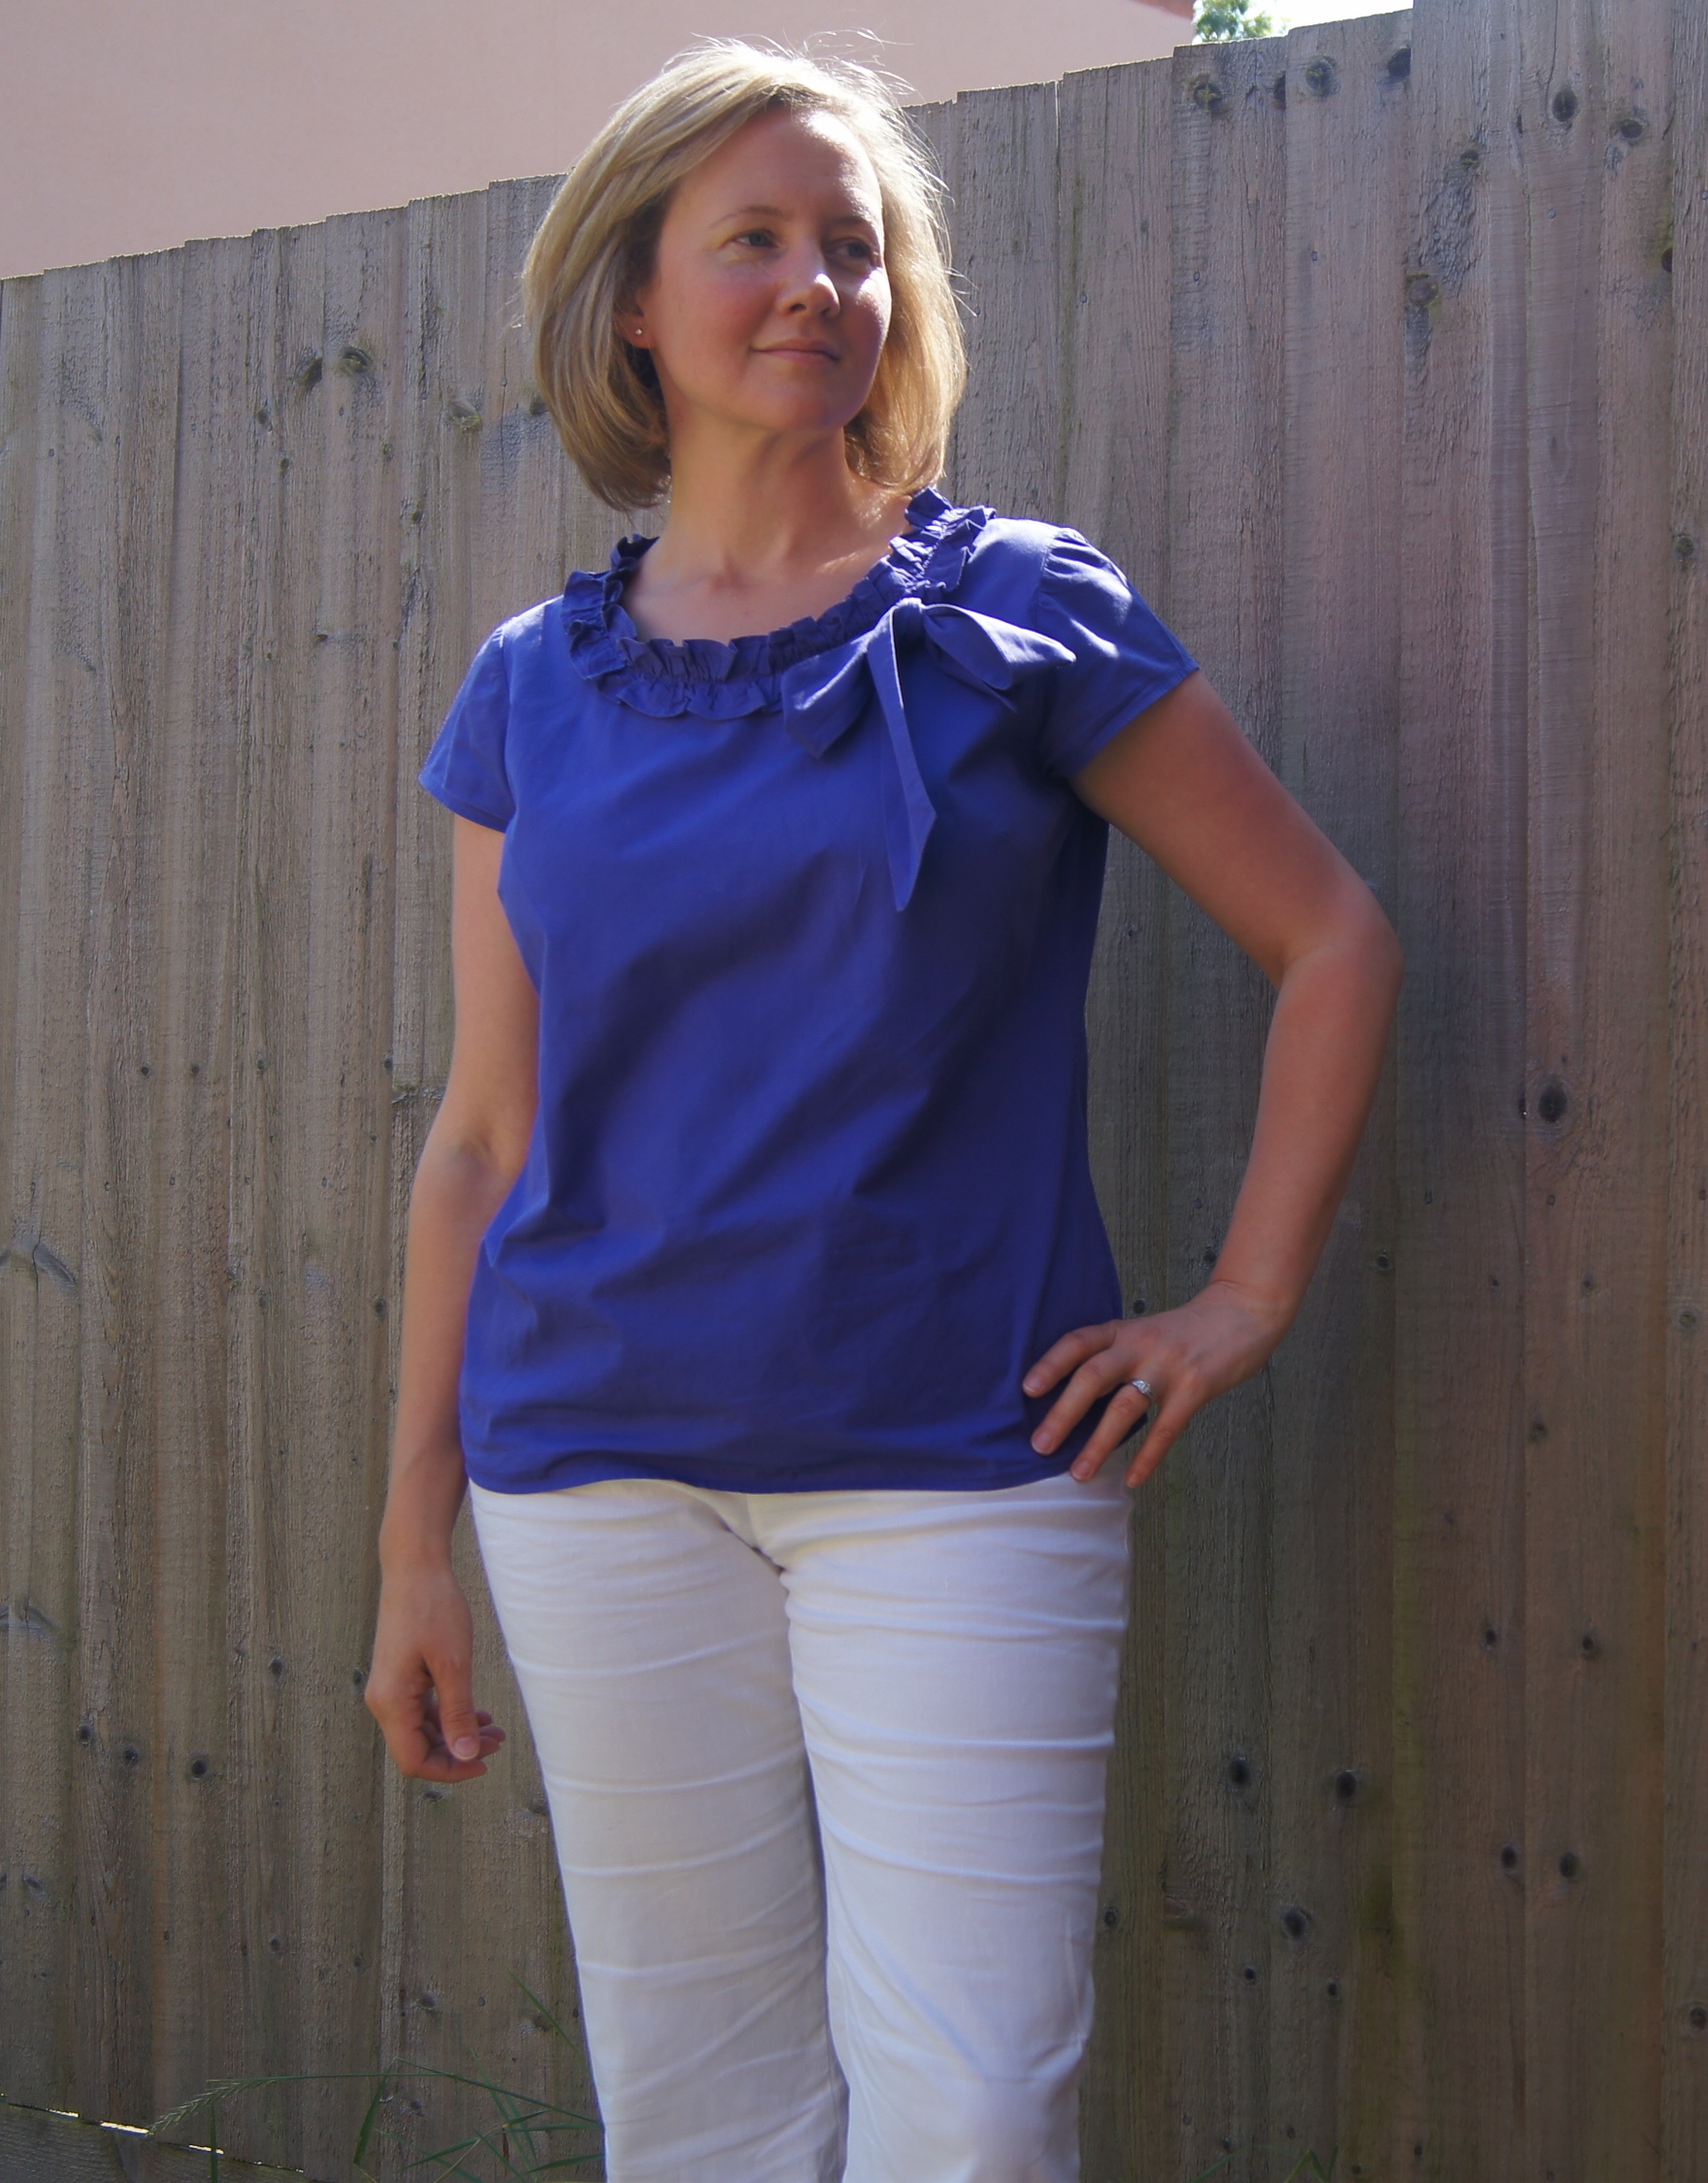
I tend to reach for the green more than the purple (which is more deep purple and less blue than it looks here), as the bow + frill combination can be a bit much.  I quite like the fact that the busy print of the green (a purchase from the mecca that is Goldhawk Road) disguises the ruffle a bit.

SONY DSC

Lastly, apologies for the barefaced photos – I can hardly believe I’ve put myself on the internet without so much as a speck of mascara but with my time constraint it was either pictures or makeup.  I’m quite enjoying the no makeup look these days, it’s definitely not my best look but I guess this is one of those things that being a mother does to you!

Better late than never …

Image

<a href=”http://www.bloglovin.com/blog/2620035/?claim=85wt4m4dbsz”>Follow my blog with Bloglovin</a>

Where did that year go?!  Apologies for the radio silence, there has been sewing, and there will be blogging again very soon.  In case anyone still cares about this little corner of the Internet, I thought I had better take care of Google Reader-related admin.  I promise that if you choose to continue following this blog, there will be something to read!

More in the very near future, hope to see you on the other side!

Jubilee Baby

What a lovely long weekend we’ve had in the UK to celebrate the Queen’s diamond jubilee.  Very little partying has gone on in our house due to a combination of weather-influenced apathy and the awkwardness of managing a baby but I didn’t want the occasion to go completely unmarked.  My little guy is the first British citizen in my family so I decided he should be suitably attired and fly the flag.  Isn’t it practically compulsory to dress your children in embarrassing outfits once in a while?!

Not wanting his American heritage to be ignored, I decided to break up the Union Jacks with some stars.

I whipped these trousers up on Friday night, using the Big Butt Baby Pants pattern from Made by Rae.  I love this pattern – it’s beautifully simple, and the back panel gives extra room for cloth nappy-wearing babies.  I can see I’ll be making several more of these for my little guy, it’s just the sort of quickie project that suits my life right now.  Maybe not in patriotic fabric, I don’t want him to hate me too much when he’s older!  Still, he looks pretty happy in them, doesn’t he?

Hope you’ve all had a lovely weekend, whether celebrating or relaxing!

Pyjama Party! Kisses for me, save all your kisses for me!

So last night at about 10:00 I got down on the living room floor with this fabric:

and started pinning my pattern pieces.  “Surely you’re not going to start sewing NOW are you?” asked my lovely husband.  I explained that I simply had to join the Pyjama Party, and after all it wasn’t the first time I’d started a party outfit the night before and I dare say it won’t be the last!  He rolled his eyes and left me to it.  As I cut and sewed last night it really warmed the cockles of my heart thinking of all of us all round the globe working on our jammies – I’m so happy to be back in our wonderful sewing community!

So hello Karen and fellow partygoers, I’m fashionably late, but I’m here in party regalia.  Yay!  I got this jolly cotton flannel when I was in California last summer, planning to make PJs.  Life intervened, but when Karen sent out her invitation I just knew I had to get these sewn up.

I almost wish I had a dog...

I really needed new PJs – I have used this pattern twice before (McCalls 5992), but both times in Christmas print – this hasn’t stopped me wearing them constantly for the past 18 months, bringing a little Christmas spirit to our home every day.  No, I am not one for chic nightwear!  One day maybe.

Not much to say about the pattern other than that I lengthened it by a couple of inches in the leg and took off 2 inches from the top.  It’s a straightforward simple PJ pattern but I like the fact it has waist ties (attached to elastic inside the waistband).  I’m accessorising with pink Waving Lace socks (link to my Ravelry project page) which I knitted a few years ago.

Working with this print has made this song go through my head non-stop while I sewed – fellow children of the (UK) 70s will probably recognise it as the UK’s victorious entry in the 1976 Eurovision Song Contest (love the dancing!).  I will nail my colours to the mast and declare my love of this annual kitschfest – although it was of course much better in the olden days.  By happy coincidence, today I heard this year’s UK entry sung by Engelbert Humperdinck on the radio, and I must say I am rather excited!  Here it is for your enjoyment – I must admit I’ve listened to it a few times while I’ve been writing this.  Royaume Uni Douze Points thank you very much!  Let’s hope it’s another rerun of ’76 – UK triumphant in the Eurovision and a lovely sweltering summer.  I don’t know about you but I’ll be wearing my new (lucky charm?) PJs when I cheer on Engelbert in a few weeks – what a perfect PJ party occasion!

But I digress.  Here we are reading Barbara Kingsolver’s Animal, Vegetable, Miracle, which tells the story of Kingsolver and her family trying to reduce their food miles by eating seasonally and growing their own.  I’ve only recently started this, but have wanted to read it for ages and so far can recommend it.

I’m so happy to party with you all!

P.S. My little guy was so excited to take part in this photo shoot that he has already christened my brand new pjs with vomit.  Nice.

Parma Violet

Well, amazing but true, this past week has seen the dusting off of my trusty machine and actual SEWING taking place.  I can’t tell you how much of an achievement this feels!  Time is at a premium with a 13 week old who refuses to nap during the daytime.

Where better to start than by jumping on the bandwagon of the lovely Colette Violet.  I’ve seen some gorgeous versions of this online, not least the beautiful fitted ones modelled by Joanne as part of the recent OWOP challenge.  I loved the fitted look but decided to go for the pattern as written to start with – I’m currently breastfeeding so slightly roomier clothes are required for easy access!  I’m not 100% sure I made the right decision as it’s a bit too blousy for my liking, but anyway here it is:

The fabric is a cotton lawn I got last summer at Anglian Fashion Fabrics in Norwich.  Can you still get Parma Violets?  I never liked them, but the print makes me think of them in a happy nostalgia way.  I cut a 12 but I think I probably should have done a smaller size plus FBA.  I might try this, and I might also go back to my muslin and put in some waist darts to see what happens – yes, I did actually make a muslin but only really looked to see if it fit around the girls properly rather than thinking about the whole picture.  Bit of a beginner mistake, cutting according to your largest part, but to be honest it was so exciting to be doing some actual sewing that I wasn’t in the mood for faffing around with adjustments.

I did take time to make the inside look good (a hangover from the wedding dress!), so it was French and self-bound seams all the way.  I also used covered buttons which I absolutely love, but I think with all that pattern a bit of piping to define the collar would be good.  Next time!

Anyway, I’m happy enough with it, and will definitely make a couple more but not before I’ve played around with the sizing.

Up next, another Colette fave, Ginger!  I’m hoping this is as quick and easy as everyone says because I really need to stop wearing my faithful maternity denim skirt – not as bad as it sounds as it’s under the bump style, but as I no longer have a bump to hold it in place it’s not ideal.

I’ve also decided to join Karen’s Pyjama Party – originally a pair of PJ bottoms was going to be my return to sewing project but the need for clothes I could wear out of the house was greater.  But now what better time to take part in my first sewalong!

Backtracking slightly

One final post on the wedding before we consign it well and truly to my sewing history!

You may remember that as well as Sue’s wedding dress I was making my own bridesmaid dress, using Vogue 1192.

Well, just to say I did walk down the aisle in this dress, which was nothing short of a miracle.  Suffice to say that not having made anything like THE DRESS before I had no idea how long each stage would take, and here is my tip to you if you ever find yourself taking on anything like this and especially if you are as novice as I am when it comes to couture sewing – ALLOW AT LEAST THREE TIMES AS LONG AS YOU THINK YOU WILL NEED FOR EVERY STAGE.

If I ever did it again, I would have a much better idea of how to go about everything and I wouldn’t have to study each technique before I used it, but as it was I found myself finishing THE dress at about 10pm the night before the big event.  Thank heavens Sue was amazingly relaxed about this, more so than I would have been, that’s for sure!

So all well and good, it was finally done.  What was not done, or even started, was my own dress, which was still in the bag as lengths of silk, lining and a very roughly adjusted pattern with a never put together toile.  Since I was Maid of Honour AND had to stand up in the front of the church and perform two songs as well (one of which was in Welsh!), attendance in underwear and shoes only was not really an option.

Lest you should think me so laid back / mad that I hadn’t thought about getting it done over the preceding months, I had felt I needed to finish Sue’s dress before starting mine.  (In the master plan, this would have happened a good month before the wedding!)

I can’t tell you anything about the making of my dress, other than:

  1. I started at 10:30 pm, sewed like a crazy woman until 5:30 am, slept 2 hours and hemmed it while putting on my makeup for the wedding
  2. It fit (more or less), but does not bear inspection, close or otherwise
  3. This is never a good idea, and especially not when you are 6 weeks pregnant and hormonal
  4. DO NOT do this at home!

Anyway just to prove it actually did materialise in the end, here I am, suitably obscured, plus a couple of action shots!

Something blue embroidered inside

Something blue embroidered inside

(Perhaps a little concealer could have been used on those dark circles!)

Anyway with that, it’s farewell to wedding dresses and onto less lofty things!

Back from obscurity – and a newly finished creation!

Hello again to anyone who still cares enough to have this blog on their radar screen after an absence of over 9 months!  Rather a pathetic showing, especially as I just checked and it’s only just over a year since I started writing it…

I was so touched by all the lovely comments on the finished wedding dress, and also amazed at the numbers of people who read that post – a very belated thank you for making all the hard work even more worth it.  Since then I have sewn hardly a stitch – except in June when I made these napkins and tablecloth for the family brunch after my cousin’s lovely wedding in California (he is in the US Marines, hence the theme).

This was a fun collaboration between me and my very talented cousin Nancy B, who designed the fabric and had it printed at www.spoonflower.com.  If only I had her talent!  (It’s hard to see here but among all that camo action are hearts and lovebirds).

I can't pretend I made these, but they were impressive - and delicious!

And sadly, that is it on the sewing front!  Not for want of inspiration, or dreaming about all the clothes I desperately need, or fabrics in the stash to create them with.  Partly it was case of total sewing overdose, but it has also been difficult to get back to normal sewing after such a mammoth project – weirdly I feel nervous of starting more ‘basic’ things because nothing else will probably quite measure up to that again.  It’s that little pair of demons perfectionism and fear rearing their ugly heads again – they will be conquered!

Big changes have also happened at Maison Bold!  Two weeks before the wedding, when I was staying up until the early hours most nights and drinking way more coffee and wine than is good for a body to deal with the mounting stress, I discovered that I was miraculously pregnant!  We had given up hopes of a family after rather a bumpy road, so it was such a joyful shock.  Thank you, wedding dress and sewing gods!  So in January I went from this:

to holding my gorgeous little miracle bundle, RTH:

who 8 weeks later is snoozing on my lap as I type with one finger.

Life is very good.  And there will be sewing again.  Soon. x

Here comes the bride!

Lovely readers, as you may have guessed the lack of posts over the past few weeks was due to major sewing going on to finish the wedding dress in time for Sue’s wedding – MANY late nights have been had, quite a few tears – both of panic and of utter relief and joy when Sue was finally able to try on the finished dress and it actually fit!

We’re just back from Scotland after a truly beautiful and amazing wedding, I am totally exhausted but wanted to share a few of my photos with you.  They aren’t the greatest, and hopefully there will be some better professional ones to come, but for now:

The radiant bride

Out of the wind, you can actually see the shape!

Back view - after dinner so a bit wrinkled by this stage!

Sue looked absolutely stunning, so incredibly beautiful, and I was so proud to have been able to give her the dress she deserved.  I can’t quite believe I managed to do it!  She is my closest, dearest friend, and I’m so glad she met Rob, a wonderful man who adores her and she him.  I was absolutely honoured to play a major role in helping her create her dream wedding, and I wish them many joyful years together filled with many many blessings.  I love you Sue!

The gorgeous and fabulously happy couple

Skinny seaming!

Thanks for your lovely comments on my last post – it means so much to know that people are willing me on in this mammoth enterprise!

So, a challenging aspect of the dress is that the whole thing has an organza overlay.  Of course, this means that beautiful, thin, hopefully perfect seams are in order!  (- Sue said she knew I’d be able to replicate the original design, as it is very clean and ‘simple’.  I know that you will understand that the major flip side of this is that there is absolutely no room to hide anything!  Oh for some frills and flounces!)

Anyway.  The skirt and bodice have 7 panels each, with princess seams on the bodice and fairly curvy ones on the skirt too.  I love a nice French seam, but they apparently don’t work on major curves, so I had to find another option.  Mock French was a possibility, but to be honest the thought of folding in all those tiny seam allowances did my head in without me even trying it!  I had a look at Kenneth King’s techniques in his book and on Threads, but my addled brain couldn’t really cope with them.

So I came up with a variation on / combination of his technique and the French seam.  I’m sure I’m not the first or only person to have used this, but I didn’t see it anywhere in my various searches.  For now (until anyone advises me otherwise) I’ll call it The Satin French Seam.

For me it nicely combines the neat, clean, crisp finish you want on this kind of fabric, the ability to make lovely thin seams (mine are about 3.5mm), and avoidance of hours of fiddly folding.  Again, this is not a quick technique (3 skirt seams took 2.5 hours), but I’ve given up expecting anything on this little project to be speedy!

Here’s what I did:

  1. As in a normal French seam, start off with wrong sides together.  Using a straight stitch foot and a 2.6mm stitch, I sewed a seam with an allowance of 15mm (my cut seam allowance was 20mm).  I stabilised the organza by sewing the seam over a strip of tissue paper.
  2. Press the seam flat to ‘set’ the stitches.
  3. Change to a zigzag foot and sew a tiny zig zag to cover the straight seam.  For mine, I used a setting of 2mm width, 0.3mm length.
  4. Press the seam flat again.
  5. Cut the seam allowance off, as close to the stitches as you dare!  I suppose if you accidentally snipped one it might not be the end of the world, because (a) you could probably fairly unobtrusively just stitch over that bit again and (b) it will be enclosed after this, but happily I haven’t needed to test that theory.  YET.
  6. Press the seam to one side, then turn so the right sides are together and the seam is enclosed, and press again.
  7. Back to the straight stitch foot, I used a 2.2mm stitch length to sew the final seam – again as close as possible to the stitching.
  8. Press three more times – first flat to set the stitches, second to one side and third on the right side to make sure the seam is perfectly open.

Tada!  The final result.  Skinny seams!

Here’s an approximate idea of what it will look like on the finished article – here just a practice one, posed roughly over my arm – this is quite tricky with two slippery fabrics and the other hand holding the camera!

Let’s hope it works as well on the bodice!

Glacial progress

Progress has been made on the wedding dress (and not before time, as the clock is ticking rather too quickly for my comfort!) – but I must admit that I have been feeling just a teeny bit stressed about the whole thing and so haven’t really had the headspace to post!

Anyway, a little bit of progress news…

We have a bodice – which even just about stands up on its own!  Here without its bones:


And a skirt, not looking like much here as it’s hanging inside out to let the seams relax or whatever they might do:

I don’t think it’s giving too much away about the final product by showing these two pictures – it’s still looking pretty generic here!

With Bridal Couture firmly in hand, I have been trying to do everything as professionally as possible.  Here’s a glimpse of the inner structure of the bodice, before the top facing was turned over:

Boning channels in place (some hidden under seam allowances, and some horsehair braid stitched at the fold line.  I must say, I felt extremely excited going to buy this, having read about it so many times on Gertie’s blog, but not being much of a circle skirt wearer I didn’t think I’d ever use it.  But Susan Khalje recommends it to give a nice sharp upper edge to a straight across bodice, so use it I did!  Going into MacCulloch & Wallis I had absolutely no idea what I was looking for, and imagined something which actually did vaguely resemble horsehair – at the very least a kind of beige / hessian type of thing!  What I was actually given was  a sort of stretchy white plastic mesh (it does come in other colours too).  I felt very professional to be needing such a thing, as if I had graduated to the next level of sewist – not that my skills have improved that much!

And then we have the skirt – the satin is underlined with a cotton batiste, and I decided that because of the skirt shape (fairly close over the hips) and fabric (slippery beyond belief) I had to avoid any misbehaving seam allowances.  What levels of sewing geekery have I reached when I tell you I have absolutely fallen in love with catchstitching.  Wow!  It looks so clean and neat and is just so satisfying!  I discovered my mom’s old pinking shears and used them as well to try and limit ravelling – I love the combination of the zig zags and crosses – sad I know, but I’m sure at least some of you understand what I mean!


It is not the speediest thing in the world to do though – for each skirt seam (i.e. two seam allowances) it took about an hour and a half, but I just pretended that I was a ‘main’ in a couture atelier and enjoyed the process (trying not to think too much about the ticking clock).  When I finished all of that I calculated that I had sewn over 17 metres of catchstitched seams on the skirt!  If anyone ever decides to inspect the skirt under the lining I will not be ashamed.

Inspired by both Susan Khalje and Gertie I am very proud to say that not only did I hand baste all the satin / underling of each skirt section together but I even hand basted the seams before sewing.  I did attempt to speed things up by testing some machine basting on one of the sections, but had to admit it really didn’t look nearly as good.  For someone who is usually perfectly happy to sew straight over pins, this is a major step forward!

Lastly, huge thanks to Gertie and Denise at The Blue Gardenia – I was very lucky to be the lucky winner of their recent giveaway of a lipstick, nail polish and fabulous vintage skirt pattern – I’m so looking forward to trying it all out soon!